User Guide - Magento 2 E-Wallet Extension
Welcome to Magehq Docs
1. Overview
The Magento 2 e-wallet extension enables your customers to make e-wallet payments and refund their wallets in case of order cancellation.
Extension link: Magento 2 E-wallet extension
2. How Does It Work?
2.1 Settings
Please go to Stores ⇒ Configuration ⇒ Magehq Extensions ⇒ E-Wallet.

- Enable:To enable/disable E-wallet extension from here. It has two options, select “Yes” to enable and “No” to disable this feature.
- Enable Bank Transfer –then, selectYes option to use the bank transfer, else select No.
- Enable Transfer Money –then, selectYes option to use the transfer money, else select No.
- E-wallet Title:This title will appear on frontend checkout page.
- Enable Min Max E-Wallet Amount:select Yes to enable
- Minimum E-Wallet Amount:then, determine the minimum value of the amount that can be added to the wallet.
- Maximum E-Wallet Amount:Now define the maximum value of the amount that can be added to the wallet.
- Enable Wallet Limit:select Yes to enable

- Cash Back Calculation Based On: –Cart BasedorProduct Based.
- Price Calculation Based On– Either selectFixedorPercent.
- Display Custom Message –The admin will select the option asYesto display the custom message else select no.
- Enable Validation while Transfer– Select Yes and it will send a verification code via Email ID.
- Customer Payee Approval Required– now, pick Yes or No for providing approval to the customer payee from admin.

Prefix for Transactions–
The admin needs toadd the prefixfor the following transactions of the Wallet –
- The credited amount by admin.
- The debited amount by admin.
- The amount transferred by the customer.
- Amount transferred to the customer.
- Wallet recharge.
- Used wallet amount.
- Cashback amount.
- Refund of an order.
- Refund of the wallet recharge order.
Cron Job Settings
Enable Cron Job for Monthly Statement– Now, selectYes or Noto send or ban monthly statements to customers on registered email id.

Wallet System Transaction Emails
Here, the admin has to select thewallet system transaction emailsto send whenever a particular event occurs.
- Wallet Recharge Email Template For Customer– When the customer will recharge the wallet then they will get the Mail.
- Wallet Recharge Email Template For Admin– When the customer will recharge the wallet then the admin will get the Mail.
- Wallet Amount Used Email Template For Customer– After a transaction from the wallet, the customer will receive the mail.
- Wallet amount Used Email Template For Admin–After a transaction from the wallet, the admin will receive the mail.
- Wallet Cashback Amount Email Template For Customer– The customer will receive the mail when he got the cashback amount as per rules set by admin.
- Wallet Cashback Amount Email Template For Admin– The admin will receive the mail when the customer got the cashback amount as per rules set by admin.
- Wallet Amount Refund Email Template For Customer– Customers will receive the mail when they will refund their wallet.
- Wallet Amount Refund Email Template For Admin– Admin will receive the mail when Customers will refund their wallets.
- Order Refund Email Template For Customer– The customer will receive the mail when the order price will refund.
- Order Refund Email Template For Admin– The admin will receive the mail when the order price will refund.
- Admin Credit Amount Email Template For Customer– the customer will receive the mail when the admin will Credit the amount to the customer’s wallet.
-
Admin Credit Amount Email Template For Admin–
The admin will receive the mail when they will credit the amount to the customer’s wallet.
- Admin Debit Amount Email Template For Customer– The customer will receive the mail when the admin will debit the amount to the customer’s wallet then.
- Admin Debit Amount Email Template For Admin–The admin will receive the mail when the admin will debit the amount to the customer’s wallet then.
- Customer Credit Amount Email Template For Customer– The customer will receive the mail when the another user will Credit the amount to the customer’s wallet.
- Customer Credit Amount Email Template For Admin– The admin will receive the mail when another user will Credit the amount to the customer’s wallet.
- Customer Debit Amount Email Template For Customer– The customer will receive the mail when another user will transfer the amount to the customer’s wallet.
- Customer Debit Amount Email Template For Admin– The admin will receive the mail when another user will transfer the amount to the customer’s wallet.
- OTP Email For Transfer Amount To Customer– The customer will receive OTP mail for verification when the customer is transferring the amount to another wallet user.
- Monthly Statement Email Template– The customer will receive the monthly statement mail after cron setup.
- Customer Transfer Amount to Bank Email Template For Admin-The admin will receive the mail when the customer will transfer the wallet amount to the bank.
- Customer Transfer Amount to Bank Email Template For Customer– The customerwill receive the mail when he will transfer the wallet amount to the bank.
- Approve Customer Transfer Amount to Bank Email Template For Customer– The customer will receive the mail when the admin will approve the transaction when the customer will transfer the wallet amount to the bank.
2.2 E-Wallet Transactions
![]()
2.3 Bank Transfer Details
![]()
Under this section, the admin will find all the details regarding the bank transfer details like –Reference, Amount, Action, Status, Transaction At, Note, and Action column. Whenever a customer goes to withdraw from his wallet to his bank account.
Allows the admin to get complete bank transfer record details with pending status initially.
2.4 Adjust Amount To Wallet

Now, the admin canEnter Amount, select what action they want to perform(CreditorDebit) from “Action want to perform on the amount” and add anote for the transaction.
The admin can select the customer for whom they want to credit or debit the amount from the list of customers with theCustomer ID,Name,Email address,Remaining Wallet Amount,Total Wallet Amount, andAdjust Amount.
2.5 Wallet Credit Rules

Wallet Credit Rules are for the efficient management of the Credit Amount process in the Wallet system. From here, the admin can easily create multiple rules for the Wallet Credit and apply them as per the condition. Mainly, there aretwo typesofCredit Rules–
- On Cart.
- On Product.
Furthermore, the admin can see all thedetailsfor Wallet systemCredit Rulesin agrid.
2.6 Wallet Payee Details

Under this section, the admin can see a list of all the wallet system payee’s details along with their status. Also, the admin candeleteorupdatethepayee statusas enabled or disabled as required.
Now, todeletea payee, select the payee and then tap on the Actions drops down option and select the delete option.
moreover toupdatethe payee status select the payee and click on the Actions drop-down option and click onUpdate Payee Statusoption. After that click enable or disable as required.
2.7 Show on frontend
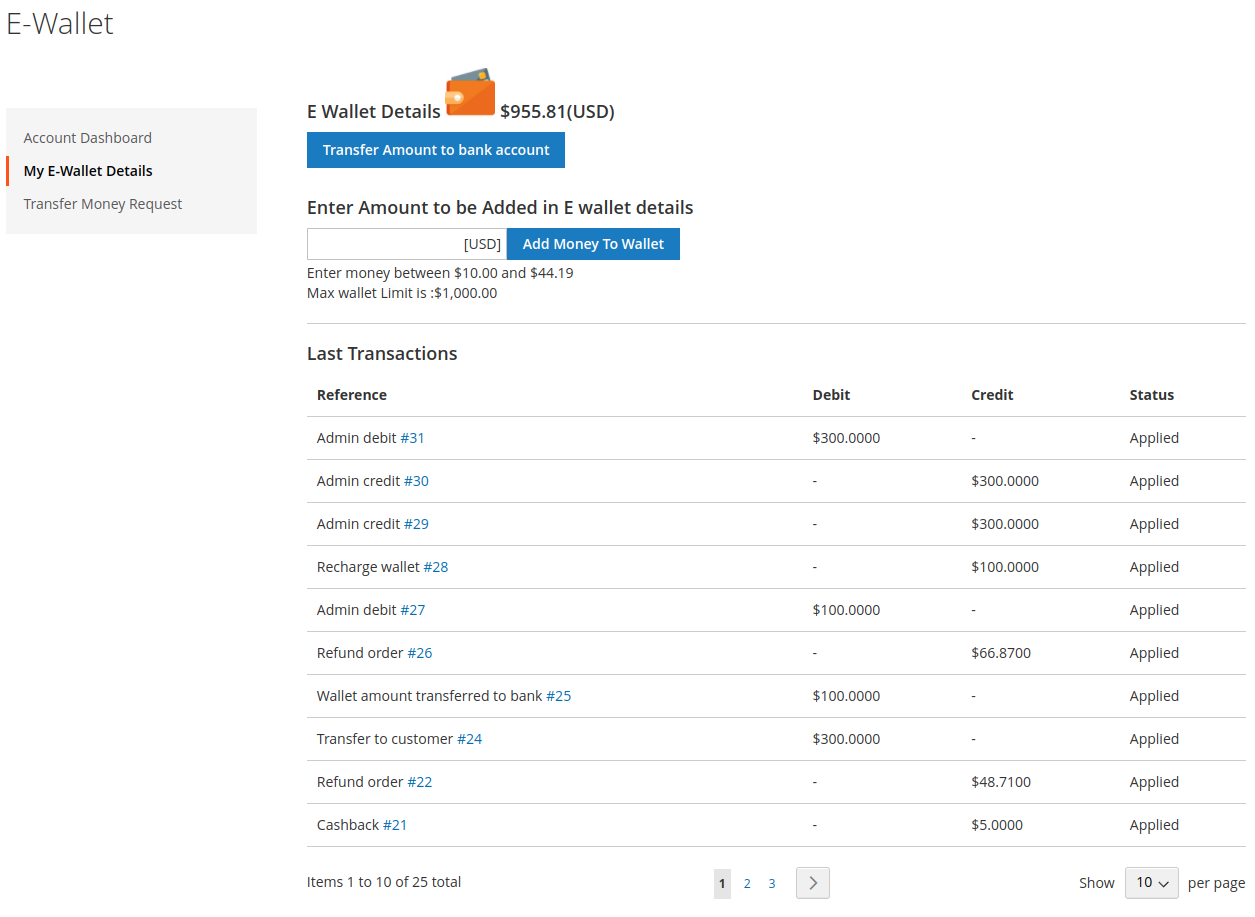
Manage Wallet Amount
Now, clicking theManage Wallet Amountsub-menu option brings up a section to manage the wallet amount.
Therefore, the customer can also see theirtotal wallet balance,wallet transaction details(credit & debit), cantransfer the amount to the bank account.
The customer can alsoadd credit amountinto their wallet system by entering the amount into the provided input box and clicking theadd money to the walletbutton.
Transaction Details
The customers can click the Reference#to view theadditional detailsfor the respective wallet transaction.

Order Summary
On the checkout page, the customers can see theOrder Summaryfor the wallet recharge. Here, the customer has to select the payment method and will click thePlace Orderbutton to complete the wallet amount purchase.